String Bass Effect and MIDI on a C2
North Suburban HAMMOND ORGAN Service
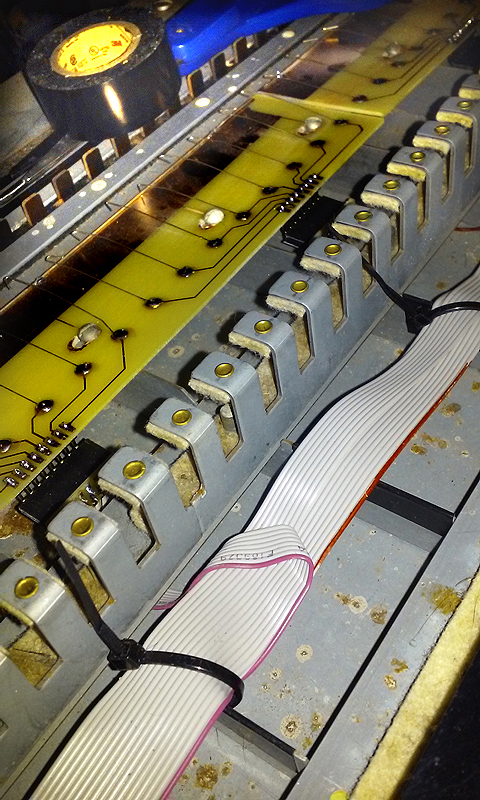
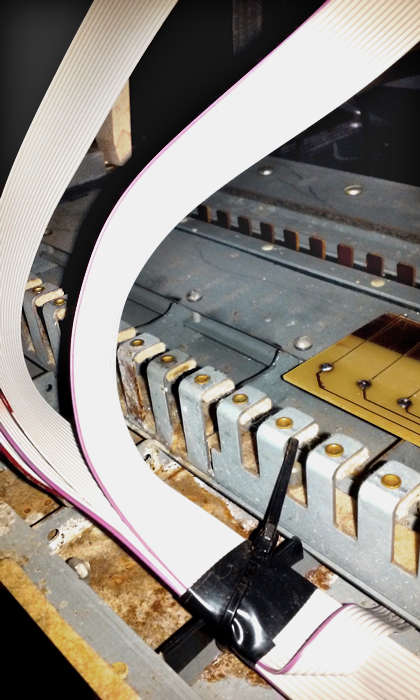
We'll continue here to see what is necessary to add MIDI capability to a traditional Hammond organ. Figures eleven and twelve both show views of the key contacts and associated ribbon cables in the lower manual of the C2.

Figure 11. Here's a close-up look at the installation of ribbon cable to connect the new key contact cards to the MIDI multiplexing cards. Ribbon cable is good for this application because as you can see, the cable is formed into a "ribbon" of sorts with all wires side-by side. This makes for a flat cable that does not interfere with normal key travel. One of the criteria for a successful addition of anything such as this to a Hammond organ is that it should not alter the touch or feel of the keyboards. The fine gage silver wire contacts do not add any noticeable loading to the key touch, and the flat ribbon cables do not create obstructions under the keys as round cables might do. Unfortunately, because this Hammond console had been used in many commercial venues, it shows some rust spots from spilled drinks on the steel plate bottom of the keyboard. Spilling of drinks is often a risk to instruments used at piano and organ bars, especially later in the night as patrons get more and more intoxicated. Fortunately for us Hammond players, other than these rust spots, this generally does not develop into any serious damage to the instrument.

Figure 12. Ribbon cables for lower manual. Getting ready to tuck these cables under the manual key combs. After that they can be guided out under the cheek blocks and out towards the rear of the console. The nice thing about ribbon cable is that it can lie flat, and also it is very easy to put connectors onto ribbon cable. Each cable has 16 wires, and the input sockets on the MIDI multiplexers likewise have 16 pins. Connectors known as IDC connectors are very easy to crimp onto ribbon cable and form reliable connections that need no soldering, and yet are mechanically very sound.
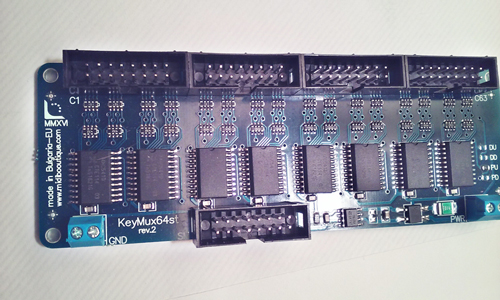
Figure 13 shows a MIDI multiplexing card. There are 64 inputs on the card, and we use 61 of them for each manual, one card per manual, and also one card per pedal. On the pedal card we only use inputs 1-25, the rest are presently unused, however we can use these for other functions as necessary if I add more capabilities to the instrument. Since MIDI is fully programmable, these could be used for a set of pushbuttons to control rhythm sounds, or perhaps for presets to bring in various MIDI functions with just a single button press. It appears that there are almost no limitations other than one's imagination as to what can be programmed in via MIDI.
As you can begin to see, it is indeed possible to, via MIDI, upgrade an older standard or traditional Hammond organ to a new, composite instrument that gives you all of the advantages of a traditional Hammond organ and also all of the new sounds and capabilities of modern MIDI. In so doing, we actually transform an older, stock Hammond into a modern musical marvel that outperforms most other electronic organs, no matter how elaborate or advanced they were when they were first manufactured. And another big plus about MIDI as I have already mentioned previously, is that the instrument imitations that modern MIDI equipment provides are very accurate and very good. I remember hearing somebody say one time about a Hammond organ, "it will give you 100,000,000 different sounds and every one of them still sounds like a Hammond Organ," Actually, the Hammond drawbars give you 387,420,489 different possible numerical combinations, and theoretically each sound is different from any other, but in actuality, so many of these sounds are so close, or just louder or softer or different pitch variations of the exact same sound, that a much more realistic statement is to say that you can get perhaps about 500 somewhat different sounds from a Hammond organ, and as regards significantly different sounds, the number is much smaller, probably around 100 or so. The old statement that a person could not live long enough to hear every sound that a Hammond can produce is simply not true. I've been playing for around 50 years, and I can truthfully say I have heard every different sound that you can get on a Hammond organ, and that statement was already true 40 years ago. It is a clear example that what is theoretically true and what is actually true are quite different! But as concerns the tonal possibilities of Hammond sounds with MIDI sounds, the number of different composite sounds is now much greater, realistically probably on the order of 1,000,000 different sounds, and I am constantly finding new sounds as I continue to experiment.

Figure 13. The 16 conductor ribbon cables connect to the upper group of 4 16 pin sockets on this, one of several MIDI multiplexing cards. These combine the 61 individual wires from a standard 61 note keyboard into a 16 note "scan matrix" cable which then goes to one channel input on the MIDI encoder card. The output of the MIDI encoder card then goes to the MIDI input on whatever MIDI device we wish to use, in this present setup, a Casio keyboard which supplies all of the MIDI sounds that we can now play from the keys and pedals of the Hammond organ. The MIDI multiplex cards and the encoder were supplied by MIDI Boutique a Bulgarian firm noted for top quality MIDI equipment, and who are world-class leaders in the design and manufacture of this and related equipment.
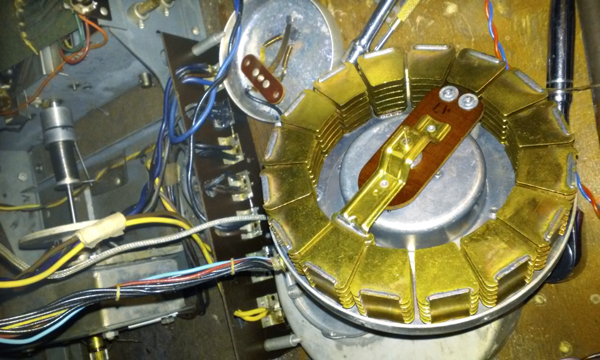
Sometimes, when you work on an older Hammond for one reason, you may encounter something else that needs attention. In this C2, I found that the vibrato scanner needed attention, in this case it had a squealing bearing that indicated the need for oiling. Unfortunately, adding oil into the scanner oil cup did not help, so I had to remove the scanner and disassemble it. After doing this, I discovered that one of the delicate oil carrying threads was broken. And, whereas oil in the scanner bearings is good, excess oil that gets on the wiring and the stationary plates in the scanner will ultimately transform the vibrato into a choppy, unpleasant sound that is more like bad reiteration than vibrato. So this necessitated a scanner disassembly. Because I already have a detailed article on the operation of Hammond vibrato in the tech article on Hammond organs, I won't repeat that here, as the function of the scanner and its integration into the entire vibrato system of a Hammond organ are detailed in that article. But what I do have here is a good picture of a scanner with the cover removed which shows the 16 sets of stationary plates around the outer portion of the scanner and also the rotating pickup inside.
Each group of stationary plates connects, via the vibrato switch, to one section of the vibrato line box assembly. The rotor has a corresponding set of plates that mesh with each stationary set in turn as it spins. The audio signals appear on the stationary plates and as the rotating set of plates passes through each set of stationary plates, the signal is coupled, via capacitor action, to the rotating plates. From the rotor, the composite signal, which now has vibrato, leaves via three carbon brushes wired in parallel for contact redundancy, and goes into the vibrato recovery section of the console preamp and then into the final output stage.

Figure 14. Hammond vibrato scanner opened for repairs. In order to simplify the job, I did not unwire the scanner from the instrument, so it is still lying on the console shelf with wiring attached. Actually, it's lying on its cover, and the synchronous motor is back on the tone generator. This was so that I could run the motor and the tone generator without the scanner in order to determine positively that the noisy bearing was indeed in the scanner and not one of the tone wheel bearings in the generator. In order to expedite this repair, because I needed to demo this console at our next meeting, I eliminated the oil threads in the scanner after manually oiling the scanner bearings. Later on, when the schedule is less hectic, I will put in new oil threads, as otherwise future oilings would necessitate scanner disassembly which is not a task that you really want to do ever if you can avoid it. Usually I have had scanners apart to clean them because the Hammond owners had been too ambitious with the oil can, but here was a case where a scanner bearing had eventually run dry. Oh well, look on the bright side! At least I did not have to do a major scanner cleaning. And as I mentioned earlier in this article, I am planning to put a variable speed DC motor on this scanner anyhow so that I can adjust the vibrato speed as I see fit depending on what i am playing. While doing all of this, I also replaced the vibrato line box capacitors, and it made a subtle but noticeable change, and made the vibrato on the very highest frequencies somewhat better.
Home Page Page 6. Next page | Previous page